Here's how:
1. Dishes: Choose your dishware carefully. Realize what colour your food will be when you finish making it, and make sure that you have a plate (or bowl or platter) that is not the same colour. I generally choose white dishes to add a nice contrast which usually makes the food stand out. However, if I'm making cream of potato soup, I'm going to want a burst of colour from my bowl to get that white soup to pop.
 |
| Left Photo - Risotto looks yellow compared to the white plate Right Photo - Risotto looks correct white colour and stands out against blue plate |
2. Lighting: Always choose natural lighting when possible. When that isn't an option, white balance becomes so important. Food can easily take on tinges of yellow or red and become unappetizing. I usually start with the auto setting and if that doesn't give me the result I'm after, I take a picture of something white to set the white balance, and then shoot my food item.
 |
| Left photo with improper white balance Right photo with correct white balance |
3. Move around: Try several different angles and take a lot of shots. Try directly overhead, try getting right down to the level of the food, try a straight shot, try a diagonal shot. You won't know what direction will produce the best photo until you see it.
 |
| These are all good shots, just depends on what you're after. |
4. Get close. If your camera has a macro setting, use that. (I have a Nikon and its close-up setting is shown as a flower). Zoom in as close as you can and make sure that you are focusing well. This will make it seem like the viewer is about to take a bite of your yummy food. (I just discovered this little setting during my research and wow, what a huge difference it makes to food shots).
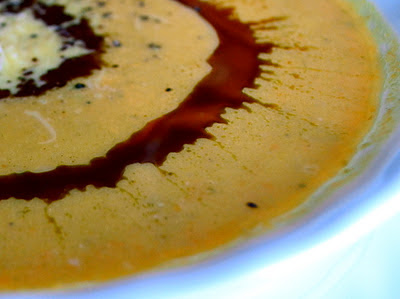
5. Styling: Put some thought and some effort into your shots. Try to imagine ways that will add to your presentation. Maybe drizzle an oil onto your soup, stack your tomato slices instead of having them spread out on a plate. Play with it until you like what you see.
And practice. That's the only way to get better at these food photos.
References:
Photojojo
Digital Photography School - Food Photography
I'm linking up at these parties:
Wow Us Wednesdays (Savvy Southern Style)
What We Wore and Made (Rae Gunwear)
Link It Up Wedneday (Junk in Their Trunk)
Super Sweet Thursday Par-tay (Fabulously Flawed)


13 comments:
You are absolutely right that not getting a good photo will not make your food look good. I'd like to forward your post on to all the mom-and-pop restaurants in my town... you wouldn't think PIE could look gross, but with the wrong photo, it can!
Love reading your photo tips, Terry. Breaking it down to little weekly topics makes it WAY less overwhelming... I WANT to be good at photography but I am just not!! (Yet!) ;)
Great tips! I have no intention of photographing anything I make in the kitchen, but I can use these tips in the craft room too, where things look way more appealing~
One time I took a picture of chili for a recipe blog. OMG. It was bad.
You and I must have the same Nikon because mine is a little flower too. You can see on my blog where I actually discovered it...LOL...before my close ups were all blurry :-)
Great tips!! :-)
These are fantastic tips, Terry! I use some of the same things when I'm photographing my jewelry, like trying the different angles and considering whether white or black or wood will give the best contrast/compliment to the piece. I didn't know that taking a photo of something white would reset the white balance! Interesting.
Great tips Terry! Since I primarily do take photos of food I really enjoyed this post! I always use my macro setting since i do take up close photos. Since the seasons have changed and the sun goes down way earlier my photos are been gross! I totally prefer to shoot in natural light (however, I do have a super duper fancy flash that my hubby bought me for mother's day and I keep saying I'm going to learn it but still haven't!!)
I have been meaning for a while to try and "style" my finished product photos but I'm always in such a rush because the kiddos need me or I don't want the food to get cold! BUT I am going to work on it!!
Thanks for the great tips!
Great tips! Thanks for sharing!
~Mrs. Delightful
ourdelightfulhome.blogspot.com
These are awesome tips Terry. I usually just shoot a picture off my hip when I cook something (because I don't have the photographer's mind)...but hopefully now, when I do, I can remember colored dishes, unique presentations, and getting closer. I'll start with those. Lighting makes my head spin (my kitchen is too dark and my camera too cheap...so I'll always be frustrated with lighting)
Thanks for linking up at {Junk in their Trunk}...this is being featured today as one of our top links!
Your tips are so helpful - thank you!
These tips are awesome. I would have never even thought of the color dishes. I love how simple that tip is. And...I guess I need to find my camera manual and figure out how to do the white balance thing. Why oh why does a simple little camera intimidate me so???
these are great tips. thanks so much for linking up to my What We Wore and Made party
Great tips! Needed that!!! :) Thanks for hosting this week!
~Julie
Post a Comment