
If you have a really dark background or a really light background, the subject of your photo may end up too light or too dark because the camera sensor is confused by all of that background.
For example, let's say you are taking a photo of a pendant and you want to set it off with a black background. The camera is going to read all of that black as darkness and think that you need a whole lot of light. So the camera will adjust the settings for that and you end up with a pendant that is washed out.
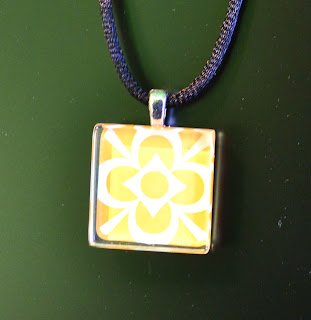 |
| f/4.5, 1/4, 1600ISO, 0.0 EV |
 |
| f/4.5, 1/5, 1600ISO, -0.333 EV |
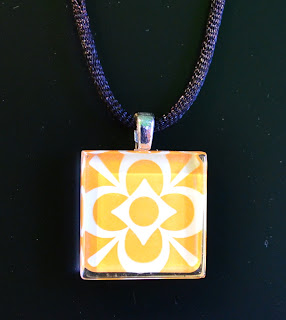
So, let's try the same pendant with a bright white background. In this case, the camera is going to see all of the light and think that the photo needs to be darkened up a bit. This will result in a too dark image.
 |
| f/5.6, 1/320, 1600ISO, 0 EV |
 |
| f/5.6, 1/80, 1600ISO, +1.67 EV |
Your manual could show you where to find the exposure compensation button, but here are examples for Nikon and Canon models.
Nikon - in A mode (aperture priority mode) you can press the +/- button (mine is right behind the shutter release button and then move the command dial (#12 in the picture below).

On a Canon, turn the big rear dial.

Phew, that was a tricky one, wasn't it. I hope it does you some good. I know that I will get something positive out of it now that I actually know how to use it, lol.
References:
Digital Photography School
Steve Digicams Knowledge Centre
5 comments:
Thank you Terry! I am seriously learning so much from your tutorials!!! I am printing this one too to put in my camera bag! I don't have a DSLR but I do have a super hyped up Canon point and shoot (I guess is what it would technically be called) and I am able to change all of the settings like you're showing us! So excited to give this one a try too!
Hey! Found this on Pinterest...thought you'd like it too! http://unskinnyboppy.blogspot.com/search/label/Happy%20Holidays?updated-max=2010-12-30T23%3A29%3A00-06%3A00&max-results=20
ooooooooooooooooohhhhhhh. I've been using it the opposite way on pics like that.
Terry, thanks. I just purchased a new camera, now I just need to take time to understand it. :-)
Holy Toledo! What a geat post! Thank you! I can't wait to try this with my camera.
-m-
Post a Comment