Friday, September 30, 2011

Friday's Motivation - Funny

No heavy theme, these are just funny:


Don't be stupid, have a fabulous weekend.  :)

Thursday, September 29, 2011

Photography Challenge - Week #10

Thursday again and the theme for this week is "Hands".  Here are some of my favourite hands.

These hands belong to my step-dad, Gary, and that is my glass of wine that he is pouring.  Sweet.


These hands belong to my mom who is tossing the Caesar salad that I would soon be eating, alongside that glass of wine.  Sweet, again.


These hands belong to my Moe.


Don't forget to head over to A Step In The Journey to check out the other entries or maybe to add one of your own, and be sure to check back for the new Photo Tips series.


Wednesday, September 28, 2011

Photo Tips #1

As you know, I'm trying to wrap my head around the complexity that is this new camera.  I've ventured outside of the auto mode, but I don't really know what I'm doing yet.  I fiddled around and now, I am doing what we all should do but don't want to do.  I'm going through the manual.  I know.  Yuck.

The first thing I did was go to the page I NEVER go to; the page I sneer at as I page through -- the camera body with all those arrows and the explanations for what everything is.  Normally I can't be bothered, but there were more than a couple of buttons that I couldn't figure out.


For example, #4 - exposure compensation button.  Not only could I not guess based on the picture what that button might do, but even after reading the name of it, I couldn't figure it out. lol

I went through each of these buttons and toggles and wheels to make sure I knew where they were and what they did.  For each button that I didn't recognize, I searched the manual to find out what it did. Not in-depth, but just to get an idea.

The manual is a pdf file which made it really easy to search for things -- just ctrl-F, type in the word, and your list of choices awaits you. Really convenient.

Okay, we know where everything is and basically what it does, so now we just have to figure out how to use all of it.  So,....here is what is coming in the next couple of weeks in a mish mashy sort of order (which I guess means there is no order):

the exposure triangle (iso, shutter speed, aperture)
     - I'm thinking of a separate post wtih experimental photos for each
the camera modes (aperture, manual, shutter speed, and whatever that P is for)
     - again separate posts with photos to help explain
the rule of thirds (composition)
how to focus (I find this particularly challenged)
how to shoot in low light (another BIG challenge)
special tips for taking food photographs

These are just some of the ideas that I thought up, but if you have any suggestions on topics that you might find helpful, please feel free to send me a note and I'll do my best to research them.  Here's to fabulous photos from all of us.  Stay tuned,.....


Tuesday, September 27, 2011

Lasagna

Do you have a favourite lasagna recipe?  Seriously, I think I make it differently every time.  I have a super streamlined version that is just a meat layer and a ricotta layer.  Then there are variations that include:

Veggies: marinated artichokes, roasted red peppers, caramelized onions, spinach, zucchini, pumpkin, mushrooms, peas (yeah, really), dried chillies
Cheese: mozzarella, Parmesan, goat cheese, cottage cheese
Meats:  chicken breast, ground beef
Sauces:  rose, marinara, puttanesca, bechamel, Alfredo

My favourite experiment was pumpkin with caramelized onions, bechamel sauce and mozzarella.  Mmmm.  It was awesome.

This version was fairly tame.


 I started by sauteeing onion, red pepper and marinated artichoke hearts.  Then I added the ground beef.  This is my little trick for draining the fat.  I line a bowl with paper towels, dump in the beef, then more paper towels on top.  I find this easier than trying to hold the heavy frypan over the sink to drain the fat.  I used to lose as much beef as I kept in the pan that way.


I used a rose sauce which was just a canned pasta sauce with cream in it.  I just eyeball it until I like the colour.  You could add cheese to this as well and it would be great.


Under this sauce is a layer of ricotta (with a beaten egg) that I forgot to photograph.  You'll have to dig out your imagination hats.


Our neighbour brought over a big bag of fresh-picked green beans for us.  Mmmm,....they were the perfect accompaniment.

Monday, September 26, 2011

Crocheted Market Bag

Kadie over at Seven Alive made this awesome market bag a few weeks ago.  The pattern was free, found on the Lion Brand yarn site, and apparently labelled EASY so I was all over copying her.  Hers turned out great.

Mine?  Not so much.

Here is my first attempt at it.  Notice how skinny the handle is? It's not supposed to be like that.


It's supposed to look like this:


Yeah!  It's okay.  You can laugh without feeling guilty.  I'm STILL laughing at the comparison.

I wish I could say that this was the only part of the bag that I messed up, but it wasn't.  Notice in the photo below how wonky the right side is from the left?  I was adding stitches when I should have been reducing stitches (or something like that).


So,...I emailed Kadie and she helped me to figure out where I went wrong (oh so many places, lol) and I gave it another shot.

It's still a little wonky but if I move at a brisk pace with this baby on my arm, nobody will even notice.


In this shot, you can tell that the sides aren't quite even, but sooooo much better than that first attempt.  Don't you agree?


I haven't actually used the market bag yet, so in the meantime it is decorating the kitchen.


And now an artsy black and white shot.  :)  (Yes, I was playing with the camera today, lol)


I'm going to move onto slippers next I think.  It'll be chilly enough for them before you know it.

This is where I'm partying:

Make it Great Monday (Etcetorize)Inspiration Board (Carolyn's Homework)Ta-Da Tuesday (Mommy by Day Crafter by Night)Wow Me Wednesday (Gingersnap Crafts)Fall Into Fall Its a Party (DIY by Design)Tip Toe Thru Thursday (Crayon Freckles)It's a Party (A Creative Princess)Stuff That Rocks (Madamyt)Thrifty Thursday (Thrifty and Fabulous)Hookin Up With Hepworths (House of Hepworths)Super Sweet Thursday Par-tay (Fabulously Flawed)Freestyle Friday (Happy Hour Projects)Potpourri Party (2805)Weekend Wander (While He Was Napping)

Friday, September 23, 2011

Friday's Motivation

Don't forget to head over to One Artsy Mama to enter her 9 (yes, I said 9!) amazing giveaways.  You can still get your name in until Sunday, September 25, 2011.


I get by with a little help from my friends.

It bugs me that your should be you're but I thought it was cute anyway.
Source


Source
Yeah, this one is just silliness.  Cracks me up.
Source
Source

Have a fabulous weekend!

Thursday, September 22, 2011

Love These Earrings

Stephanie from Gathered in the Kitchen had a giveaway a few weeks back when she revamped her blog and I was fortunate enough to win.  The prize was a pair of these gorgeous Swarovski crystal earrings that she made.  I chose the white pair.

This is the adorable card that she sent. (Yeah, I got a thing for adorable cards).


And here are the earrings.  I should get extra credit for not chopping off my entire head like I usually do.   Aren't those earrings gorgeous.  They really shimmer when the light catches them.  So pretty.


I didn't really like this photo - of myself especially, but also because you don't get a clear shot of the earrings. So I tried a few more.

See this photo here?  Well, I have just finished polishing off 2 chocolate chip cookies that I really should not have had, but I was home alone and you know how that goes,.....only,....check out my lip,....yep, that's a chocolate chip remnant, totally giving me away.  Nice.


How about without the chocolate face?


Just focus on the earrings, will ya?!  Thanks again Stephanie.  They go with everything (including chocolate chips) and I love them!

Photography Challenge - Week #9

Don't forget to head over to One Artsy Mama to enter her 9 (yes, I said 9!) amazing giveaways.  You can still get your name in until Sunday, September 25, 2011.

Check it out.


It's Thursday and we all know what that means,......Photography Challenge over at A Step in the Journey.  This week's theme is "A Mess".  As you can imagine, it wasn't that hard to find one.


Does everyone's desk look like this when they're in the middle of a project?  Obviously mine does, though usually there is a cat in the midst there somewhere.  So in actual fact, this is cleaner than usual.  :)

Head on over to check out the other submissions:


Also check out:


Button

Wednesday, September 21, 2011

Falling for Crafts Challenge - Week #2

Don't forget to head over to One Artsy Mama to enter her 9 (yes, I said 9!) amazing giveaways.  You can still get your name in until Sunday, September 25, 2011.


Check it out.


So, if you haven't already checked it out, be sure to pop on over to Amy's site, One Artsy Mama, and see all of the entries in her Falling for Crafts Challenge.  Last week's theme was centerpieces and they are all gorgeous.


This week's theme is A Fall Snack or Recipe.  Mmmmm,...food.  I'm all over that.  Yesterday's spiced plums could definitely meet the criteria but I wanted to try something else.

Today I whipped up a fall snack with peaches.  The neighbouring orchards are nearly all picked but the fruit stands are still full of peaches.  Fabulous, local, fresh, delicious, did I say fabulous peaches!  So that is what inspired this little bowl of deliciousness.


I started by slicing up a peach and topping with 2 big spoonfuls (more like blobs) of plain yogurt (you could obviously use whatever flavour you like, I'm just a weirdo who prefers plain). 

Then I mixed about a tablespoon of fig jam (that I was turned onto by Rindy Mae) with a healthy squirt of balsamic vinegar glaze.  I had to add a little bit of water to make it runny enough to pour.  If you don't have balsamic glaze, you can use vinegar and then you probably won't have to add any water.  Drizzle this little bit of figgy heaven over top.  

Toast up some sliced almonds and sprinkle those over the top.  Maybe grate a little fresh nutmeg.


This was beyond fabulous.  I made it again the next day and ground a bit of crushed black pepper over it all.  The perfect finish.  Mmmmm,...I love fall.

Tuesday, September 20, 2011

Spiced Italian Plums

Don't forget to head over to One Artsy Mama to enter her 9 (yes, I said 9!) amazing giveaways.  You can still get your name in until Sunday, September 25, 2011.

Check it out.
Italian plums are the purple oval ones that sometimes end up as prunes.  I'm not a big prune fan, but I must admit that I do like the plums.  Our awesome neighbours brought over a big basket of them for us but it was more than we could eat, so I searched for a recipe to can them.

I've never canned before so this was going to be a double-duty project:  learn how to can and save those plums. Sweet.  Literally.

For starters, I found an interesting-sounding recipe for spiced plums in port.  We have an incredible surplus of port in our house as the result of my husband searching for "that port he had at that place that time."  There were a lot of no-gos.   Anyway, port and plums -- sounded yummy to me.  You can find the recipe here, but basically it is plums, sugar, and spices.  The smell in the house was insanely delicious while this was cooking.  Seriously.

I started by pitting and halving the plums.  The pits came out very easily.


In a saucepan, I combined the water, sugar, and spices and let it come to a boil.


Then I added the plums and let them cook for a few minutes.


After that the plums found their home in the jars (I popped them in the dishwasher to make sure they were sterile) (the jars, not the plums) and boiled the lids (though I read later you should only use hot water, not boiling).

The jars were filled with the plums, then I poured the sauce in.  To get out the air bubbles, I used a long metal skewer.  When you do this, don't get too rambunctious or you'll end up making more bubbles than you get rid of.  Not that I did that or anything.  Sorry, no pics of that part.  I was totally concentrating.

Once they were filled, I wiped the rims and hand tightened the tops.


Then into the water bath.


Once the water came back up to a boil, the timer started for 20 minutes.


So after 20  minutes I used these barbecue tongs to remove the jars.  It wasn't easy.  They kept sliding and I nearly dropped them a hundred times.  We all know my burn record so I was nervous to say the least.  I finally get them all out, only to discover:


Yep, there are little handle thingees on that metal part so you can easily grab that and pull it out of the boiling water.  Who knew?


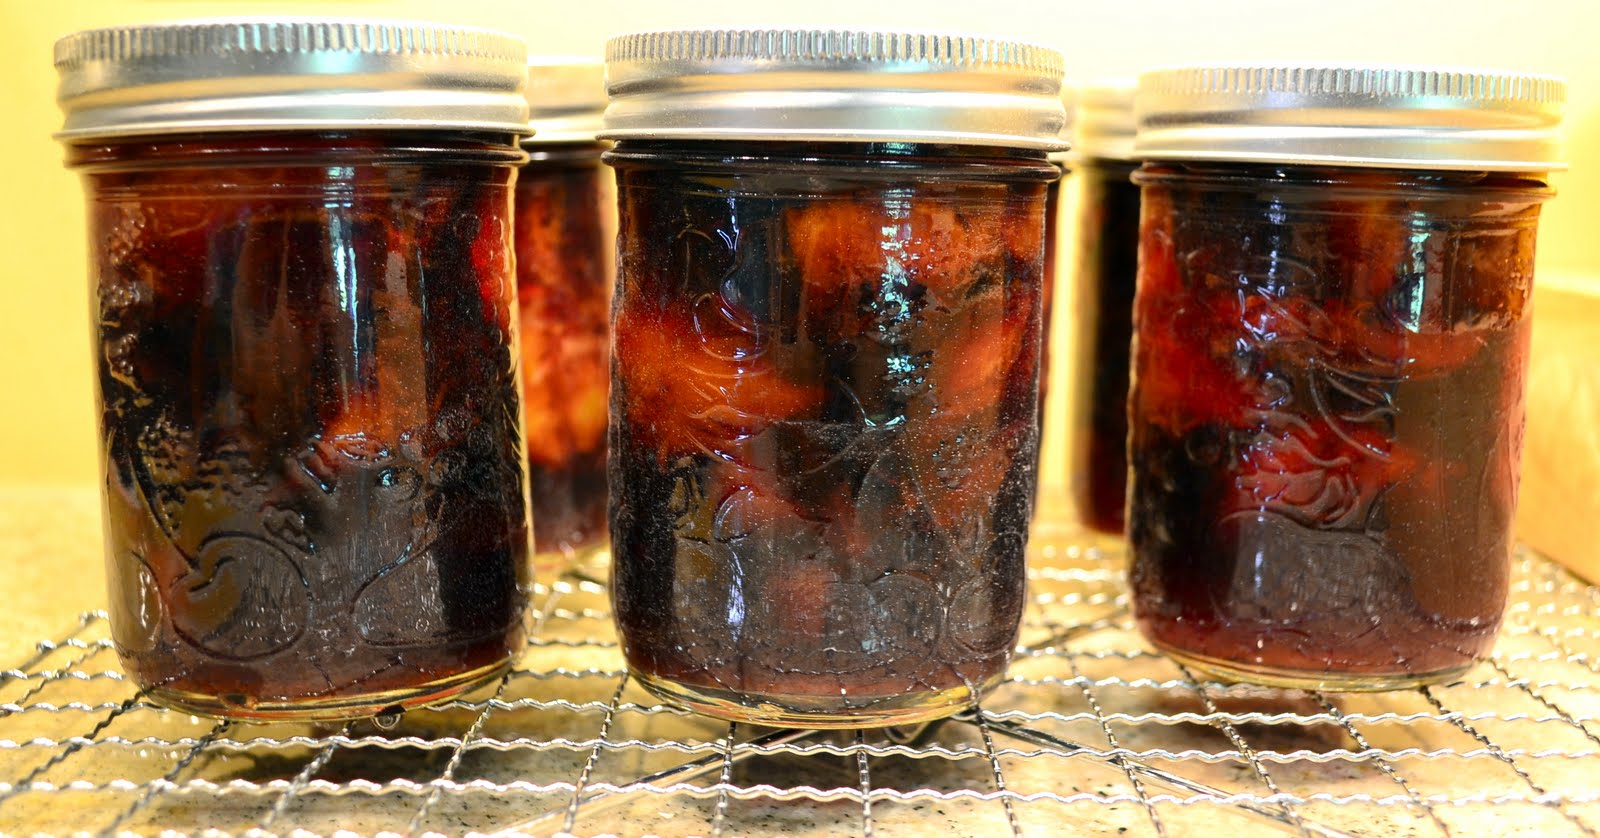
The recipe said to let them sit and cool for 24 hours.  I put them on this cooling rack so the bottoms would cool too.  As they were sitting there, I heard these popping sounds.  I had to Google - was that a good thing or a bad thing?  Turns out it's a good thing (you probably already knew that).

There was some leftover syrup that didn't make it into the jars.  I had this last night over plain yogurt and it was awesome.  Sweet, but not overly so and you could definitely taste the plums.  If it's any indication as to how fabulous the plums are going to taste, I'm pretty excited.

This is where I'm partying:

Ta-Da Tuesday Link Party (Mommy by Day Crafter by Night)

If you enjoyed this read,...

Consider joining me over at my active blog: Write Create Connect
Related Posts Plugin for WordPress, Blogger...