
Shutter speed measures the time that the shutter remains open. The camera settings are marked in seconds or fractions of seconds. The shutter speed works with the aperture and ISO to produce a correctly exposed photograph (more on this next week when we tackle the exposure triangle).
One thing that you can do with shutter speed is shoot in really low light. By keeping the shutter open for a prolonged amount of time, you can get enough light onto the sensor to create a photo.
This first photo was shot at night but the shutter stayed open for 6 seconds (yep, had to use a tripod), allowing so much light to hit the sensor that it appeared to be daylight.
 |
| f/7.1, 6.0, 1600ISO |
 |
| f/7.1, 1/2, 1600ISO |
Though shutter speed can help with low-light, it is much more often used to capture movement, either by freezing the motion or by creating an artistic blur.
For example, if your children are running around in the yard and you want to freeze their movement, you will choose a fast shutter speed. I don't have children and there haven't been any running around our yard so I had to settle for a metronome. Yeah,....not really the same thing. Sorry, lol.
Anyway,....to freeze the motion of the metronome, I used a fairly fast shutter speed of 1/250.
 |
| F/3.5, 1/250, 1600ISO |
 |
| f/11, 1/6, 1600ISO |
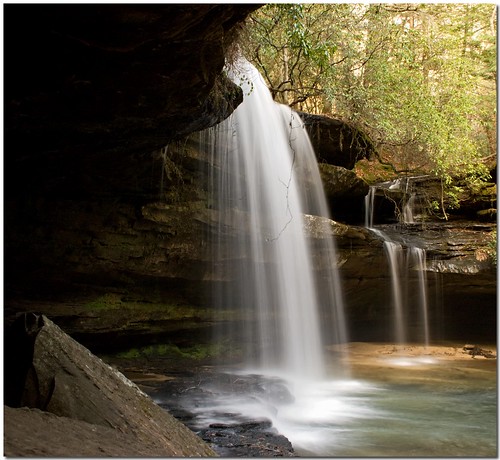 |
| Upper Falls at Caney Creek by K.W. Sanders. |
Another creative use of shutter speed is shown below. Again, the shutter is kept open longer (slower shutter speed) so that it can record the movement of the car lights. (Yeah, this isn't my photo either).
 |
| Top Design Mag |
One thing to keep in mind when shooting at slower shutter speeds is that if you are unable to keep the camera still, you will end up with unintentional blurring of your photos. Digital Photography School gives a good rule of thumb: Keep your shutter speed denominator (the bottom number in the fraction if you're rusty from school), greater than your lens length. In non-technical words -- if your lens is 50mm (it says this right on the lens if you're unsure), then you want to keep your shutter speed above 1/50; if your lens is 75mm, keep your shutter speed above 1/75, etc.
With slower shutter speeds, you might want to use a tripod to ensure that the camera remains still. It is also a good idea to use the self-timer so that you don't shake the camera when you press down on the shutter-release. Holding your breath or resting the camera on a table or stable object may help you as well.
References:
Digital Photography School
Photography Bay
SLR Lounge - has a great list of further reading
Light Stalking - amazing waterfall photos

2 comments:
ALright, I'm needing a tripod.
Nice tutorial Terry. Great examples too. That waterfall is stunning.
Post a Comment