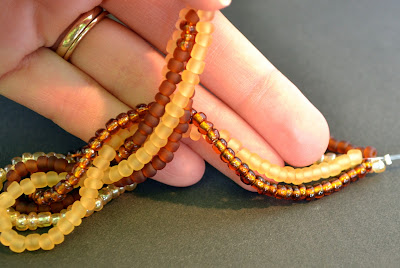
I started with 4 strings of beads. I used a crimping bead and fed all four strings through, and then crimped. I did this at both ends so that the beads wouldn't come flying off. People who follow me on Facebook know that I did this precaution after those beads came off several times. Eventually, I learn. :)
In this photo, you can see the crimp bead with all four strings fed through it.
After you crimp both ends, lay out your bracelet flat. To get the twist, hold down the right-hand end with your right hand and don't let go throughout all of the steps.
Separate the first strand from the rest of the strands.
Pick up the left-hand end of the bracelet and fish it underneath that first strand that you separated. You'll notice in this photo that I moved my right hand. That was only to take the photo. Don't move your right hand. :) (again with the smiley face)
Pull the left-hand strands all the way through and re-straighten the bracelet. Next, you want to move over the first and second strands.
Once again, take the left-hand end of the bracelet and fish it underneath the first two strands that you separated. (keep your right hand holding it down)
And pull it through.
Next, you separate the first, second, and third strands. You probably figured that out already, didn't you.
Keep repeating (the next step would be back to separating away the first strand again), until your bracelet has the right amount of twist. When you're happy, go ahead and fasten on a jump ring on one end and a lobster clasp to the other. That's it - you're done. All that's left to do is show it off.
As always, if you have any questions, please don't hesitate to ask. It's tricky to explain, and I clearly needed at least one more hand for the photos, lol.
This is where I'm partying:


21 comments:
I love how this turned out! And even better, I could make this from my stash! :D Thanks for sharing the how-to, I've never seen the twisty technique explained.
Thanks so much for the tutorial!!! I thought of you the other day...I had a bunch of play necklaces from when I was a kid that I gave to my girlie for Christmas. One broke and needed to be restrung so I busted out my bead supplies and got to work..after I had strung it I dropped it...twice!!! Although it didn't take me 3 days to string like your other project, I definitely felt your frustration!! :-)
I have a bazillion baby beads right now and I've been like, " Oh, baby beads. What is it that you are meant for in this life? "
Now I know!
♥
Great idea!! So very elegant!
Look how smart you are!! I really have tried to do it before and ended up throwing everything in the trash, after I swept the beads up off the floor!
This looks sort of complicated but the end result is worth it. I think your color combo is stunning. The twisting gives the bracelet so much more presence. Sorry I wasn't there to be your extra hand. :o) I'll be at your party tomorrow for sure!
Thanks for the great tutorial! I've always wondered how it was done! :)
So pretty! Thanks for the great tutorial! I would love for you to share at my Blog Stalking Thursday Link Party!
http://thecraftyblogstalker.blogspot.com/2012/03/blog-stalking-thursday-33.html
I love that twisted effect! It turned out so great...I'm not so sure about my ability to do it myself, though...why don't you come over for coffee and then show me?
Beautiful! I always wondered how they did that.
This is cute, & I love the colors you used! I'm your newest follower, hope you'll follow back:)
www.rockpaperscissorscreate.blogspot.com
I think it turned out very nice...good color choices! Thanks for sharing at the Rock 'N Share.
Greetings from Hamilton! I love the twisty effect. Forgive the stupid question, but what does 'fish' mean in this context? Pass through? Sigh, so stupid.
Girl, you know how I feel about you and about this tutorial! So glad you entered One Crafty Contest! Good luck!
Love the bracelet very pretty and nice colors. Good Luck and thanks for linking up to One Crafty Contest, xoxo
I Love it! It's so cute! I am visiting from the One Artsy Mama Craft Contest. I am a new follower! I hope you will stop by http://www.garagesalesrus.blogspot.com/ and do the same.
Robin
I just made this and it was fun and I love it! I have pictures if you would like to see...Happy Hour Projects sent me.
Shannon - I would love to see photos of your bracelet!!
Because you twist this bracelet, do you a little longer strands of beads?
Thank you so much for the great tutorial. It worked beautifully. What I need help on is to then attach a nice clasp with all 4 strings and have it look nice. :)
I did not see how you attached the lobster claw clasp. Can you explain that part of the design to me, please.
Post a Comment